Tuesday, June 19, 2012

Photo TIPS! ~ Bokeh

"BOKEH!!!!" 

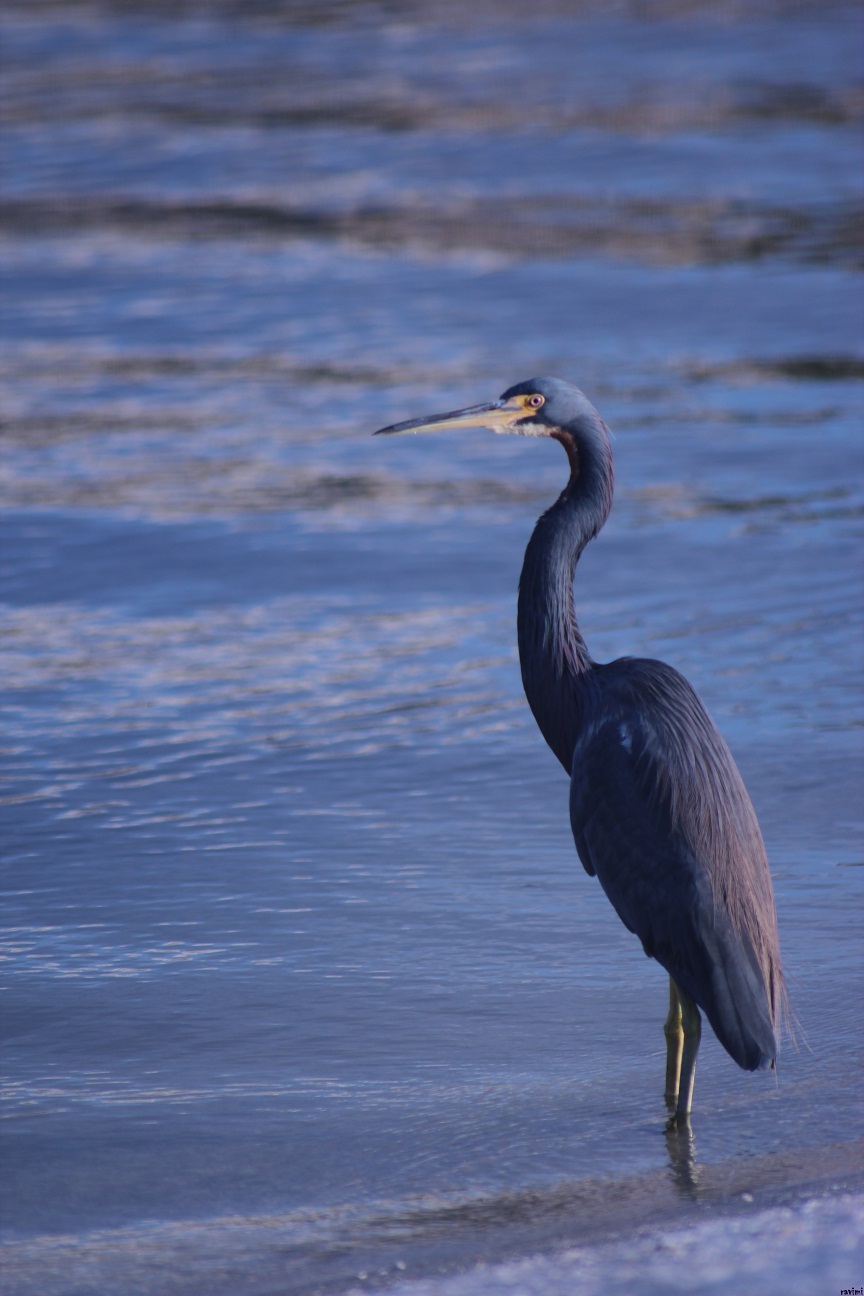
You might have seen that over the internet in the comments of a photograph, or even as the name of a  photograph, but what does Bokeh mean?
First lets start off with clearing up some confusion I have seen related to Bokeh. One of the big confusions that I see very often is confusing Bokeh with the actual background (the things that are in the background) but Bokeh is related to how the background looks when it is blurred. To further explain the confusion lets use one of my pictures:


If you look towards the right of the picture (the eagles left side) you might notice how the ferns (the green plants, also located under the eagle) begin to blur. The blur itself is the Bokeh. If you look even closer, the blur begins to resemble circles. The reason it is shaped like a circle is because the lens, in which the light enters, is circular.


*If you grab a piece of paper and cut a star shaped hole into it about the size of the front of the lens, and place it on the lens the Bokeh will become star shapped (once again, the shape of the lens where the light enters determines the shape of the Bokeh). 

The confusion I see most often is thinking that the Bokeh is the background itself, and NOT the blur. The blur is what determines Bokeh, if the background is very clear and focused (normally when using small Aperture Click here for Tutorial on Aperture) and there is no blur then there is no Bokeh.
A picture with no Bokeh looks like this:

Notice how the entire background is in-focus and there is no blur.  

Now how do you make Bokeh? Well it's very simple. 

Bokeh is created when the Aperture of the lens is very large (small f/stop #) and there is a small amount of focused space relative to the size of the background. What that means is that if I have an Aperture of f8 (8 f/stop) and I am taking a picture of a person standing 5ft away from me, and we are on a field that is 300yd long, then the background will be out of focus because the 8 f/stop number is not capable of focusing so much space in the background. In other words it is possible to create Bokeh (blurry background) with a large f/stop #, as long as the background contains a space larger than the in-focus area.
The easiest way to achieve Bokeh is to have a very large Aperture (low f/stop #) like f1.8 (f1.8 = 1.8 f/stop) or any number usually lower than f5.6. This will create a very small amount of in-focus area when taking the picture and so if the background goes about 15ft further than the subject in focus then you should have the blurred effect: like this:

I used a VERY small f/stop # (Big Aperture) therefore the background is completely
blurred.

Good/Bad Bokeh

This, like art itself, is very relative to taste. Some people might consider Good Bokeh bad, and Bad Bokeh good. The background of the picture above of the flower might look nice to some, but ugly to others. In reality I do not know of, and doubt the existence, of a standard for depicting the quality of Bokeh. Bokeh is like air, it is what it is, and you either like it or not (I hope you like air for your own sake). So you are the one that determines the worth of Bokeh, but only for yourself. I love the image of the flower above because of the HUGE contrast there is between the in-focus flower, and the completely burred background. Yet the smooth texture of the flower blends in quite a lot with the smooth background.

If you have any questions let me know by posting in the comments section under the post. Let me know if you enjoyed the post, and if it was helpful. Remember to SUBSCRIBE and if you would like a free picture (after subscribing of course ;)] the follow this Link.

Keep on Snappin',
Ravimi

Monday, June 18, 2012

One of those Randoms! ~ "Collage Photography"

So while I was navigating through my Blog I noticed something interesting; when I scrolled the page to just the right spot, the picture on the foreground matched up with the picture in the background! I saw this and I thought of how awesome it would be to put them together, but then I remembered that I would never published any edited pictures! Anyways I thought about it pretty hard and decided to do it for the fun and the art I could be making, almost forgetting it's a photograph and focusing on the Collage art aspect and that I would give it away for free to followers of my photography. Yes, the picture below is for you, it's a thank you for signing up on any of my social media sites and following my progress as a photographer.

Fun Fact: All the images used to make this collage were taken on the same day, within the same hour, and for the same theme: Sunset photography. Also, almost all the pictures are taken towards the same direction and are positioned (on the Collage) similar to where the were taken.

Share this with everyone you know and get them to SUBSCRIBE! and if you haven't signed up yet and would like to download this picture then make sure to SUBSCRIBE! Stay tuned for more Collages in the future.


Keep on Snappin',
Ravimi


Sunset Miracles 

Sunday, June 17, 2012

Photo and Personal Style ~ Continuation

Here are some more pictures I've taken! I hope you enjoy.

ISO 100
1/1250 Shutter Speed
2.5 Aperture
50 mm 
ISO 100
1/4000 Shutter Speed
5.6 Aperture
300mm 
ISO 100
1/4000 Shutter Speed
5.6 Aperture
300mm 
ISO 100
1/4000 Shutter Speed
4.0 Aperture
75mm 
ISO 200
1/125 Shutter Speed
4.5 Aperture
50mm 
ISO 200
1/125 Shutter Speed
6.3 Aperture
50mm 
ISO 100
1/250 Shutter Speed
13 Aperture
50mm 
ISO 100
1/400 Shutter Speed
5.6 Aperture
300mm 
ISO 100
1/200 Shutter Speed
5.6 Aperture
300mm 
Keep on Snappin',

Ravimi

Friday, June 15, 2012

Photo and Personal Style

So I was looking at my latest pictures and decided it should be about time I shared some information about my photography process. The pictures below were taken during the afternoon Golden Hours near a bridge that connects two cities (both cities divided by a very large body of water).
The first image is of a wave breaker that had been broken down by the waves. The warm yellow and orange light from the Sun helped create a more lively subject. I focused on the middle because I liked how that section of the wall was lower and closer to the water.

*Some of you may have noticed the "Personal settings on camera" part under the image's description. This is part of the description refers to the camera settings used, ex: Sepia, Black and White, Purple, Green. Except I used my own settings that I developed through experiences with shooting SOOC (straight out of camera). All my pictures come directly from the camera and never go through any post processing after being taken. This made it difficult to sometimes get the "real" colors and details I saw with my eyes, so in order to stick with my self-enforced goal of being an SOOC photographer I used my knowledge to fiddle around with my camera settings until I found what best pleased my taste. 

The second image was when the sun was almost at the ends of the earth (that means almost under the horizon). I really love this picture because it makes me think, for whatever reason, of the 1930's, which was a time in which I never existed. It also reminded me of The Great Gatsby kind of sunset. This image was also shot with my own personal settings. I used a medium sized Aperture in order to maintain the clouds in focus but not so closed that the magical detail created by low f/stops would be effected. Similar to the first shot, the Aperture that is closer to being more open (small f/stop number) the more focused and the better the lens tends to work (I recommend an f/stop between 2.2-3.5).

ISO 200
1/250 Shutter Speed
2.2 Aperture
50mm
Personal settings on camera*

ISO 100
1/200 Shutter Speed
5.6 Aperture
Personal settings on camera*
I hoped you liked the images and remember to SUBSCRIBE!

Keep on Snappin',
ravimi

Contests! "Free and Worthy 7"

So I've decided to start a post based only on Contests. I will Try and do one of these posts on a monthly basis. The post will contain a list of 7 contests that are, as the title states, "Free (no fee to apply) and Worthy (prizes are worth the investment)". I hope you like these posts, if you do make sure to share them with your friends.

CONTEST LIST


If you know of any other contests let me know and if I find it "Free and Worthy" I will post on the next contest post with your name/username being referenced (unless asked not too).

Keep on Snappin',
Ravimi   

Thursday, June 14, 2012

REVIEW! ~ Canon Speedlite 320ex

Good afternoon and welcome to the next ravimi blog post! Today I will be doing something special, not because I'm reviewing a special product (but it is special in some ways) but because I do not write many reviews on my site, unless requested (like this one).
Anyways, today I will be talking about one of Canons latest products: the Canon Speedlite 320ex. I've owned this for about 2 months now; therefore, I will only be able to give a review based off my knowledge and experience of 2 months. I would like to think my reviews as being a little unique; I personally am not a person that looks at a product and talks about the negative aspects of it (unless it's really obviously bad) but I focus on the good, and reinforce those good aspects and how they serve to your advantage. So lets get down to business!

The 320ex is a part of the Speedlite series that consists of the 220, 270 (II), 320 (yours truly), 380,420, 430, 550, 580, and 600. When I bought this flash one of the main things that caught my attention was the on-flash shutter button (shown in the picture below).


Courtesy of Google images

This flash was the very first of the canon ex series to have this accessory, which is one of its special aspects. I use it pretty often when I use the flash and it has helped a lot because now I can stay with the flash and move it where needed without having to go back to the camera to take the picture (to use this the flash has to be pointing towards the camera when pressing the button and then you have 5 seconds, or so, to move the flash back into position. The furthest I got with the flash was about 20ft and I still had the ability to use the shutter button.
Another special thing about this camera is that it has an LED light source (as shown in the image below).

Courtesy of Google images (the red arrow was my little edit)
This LED light serves for the video mode of the camera and is used during video shoots in dark locations. This was the first Flash to carry this capability when I bought it about 2 months ago. The LED is useful but it is also not very powerful because it is small; therefore, it cannot carry a large LED power source that projects a lot of light. The light does work when the subject is about 3-5ft away in total darkness, but that is the limit if you want to maintain the subject visible.

This flash has been very helpful when I needed it. It serves great as a bounce flash (using surfaces to reflect the light off) and is great as a slave flash. It cannot be used as a Master flash from my current knowledge but for a flash that is not to expensive relative to it's siblings it is a great purchase. The battery life is great: I shot about 200 pictures with full power and it always kept up to my needs (which was 1 picture every 5-15 seconds) and there was enough power left that I was able to use it for half of  another event without having to change batteries (uses 4 AA batteries). The 320ex also has a telephoto mode where the head piece (where the bulb is located) can extend about half an inch forward; this allows for images to be taken from about 5-10ft further than the normal position.

Some issues:
The only issues I had were personal preferences:
1) Lack of diffuser card (the little white card that can be popped onto the front of the bulb)
2) Cannot control the strength of the flash when in slave mode. (If someone knows how please do let me know and I will update this review.)
3) nothing, that's it, not too many complaints.

As my first Flash, I am very pleased with this product. It is very useful and inspires me to continue learning more on how to use it. I very much recommend this light as a first flash for all the reasons I talked about and because I have very little complaints for it. It is very light (weight) and easy to manipulate. If this is NOT your first flash and you own 1 or more flashes that have "slave" capabilities then I recommend buying a different flash that has "master" capabilities (ability to control "slave" flashes) I would recommend the 430ex from what I have read and seen from other users, but as a first time flash I highly recommend the 320ex.

This information is straight from the canon website and I'm sure will be of interest to those who are are interested in the specifics of the 320ex Speedlite.


Type
On-camera, E-TTL II/E-TTL autoflash Speedlite
Compatible Cameras
Type-A EOS cameras (E-TTL II/E-TTL autoflash)
Guide Number 
Flash CoverageISO 100 (m)ISO 100 (ft.)
Normal (24mm)2478.7
Tele (50mm)32105
Flash Coverage
EF lens: 24mm/50mm

EF-S lens: 15mm/31.3mm

Manual switching
Number of Flashes
Approx. 180 - 1000 flashes, with fresh AA-size alkaline batteries
Recycling Time
1) Normal flash: Approx. 0.1 - 2.3 sec.

2) Quick flash: Approx. 0.1 - 1.8 sec.
Flash Range
Normal Flash
Guide No. (ISO 100)Aperture Value
f/1.4f/2f/2.8f/4f/5.6
24 (Normal)56.1 ft.39.4 ft.28.2 ft.19.7 ft.17.1 ft.
32 (Tele)75.1 ft.52.5 ft.37.4 ft.26.2 ft.18.7 ft.

Quick Flash

Guide No. (ISO 100)Aperture Value
f/1.4f/2f/2.8f/4f/5.6
13.8 (Normal)32.5 ft.22.6 ft.16.1 ft.11.2 ft.8.2 ft.
18.4 (Tele)43.0 ft.30.2 ft.21.7 ft.15.1 ft.10.8 ft.

High-speed sync (at 1/250 sec.)

Guide No. (ISO 100)Aperture Value
f/1.4f/2f/2.8f/4f/5.6
13.8 (Normal)28.2 ft.19.7 ft.14.1 ft.9.8 ft.6.9 ft.
18.4 (Tele)37.4 ft.26.2 ft.18.7 ft.13.1 ft.9.5 ft.
AF Assist Beam
Intermittent flash firing system

Effective range:

1) At center: Approx. 13.1 ft./4m

2) Periphery: Approx. 11.5 ft./3.5m

3) LED light: Approx. 13.1 ft/4 m

*Compatible with model EOS 5D Mark II and later. Available via firmware update for: EOS-1Ds Mark III, EOS-1D Mark III, EOS 40D, EOS 50D, and EOS Rebel XS.
Custom Functions
1) C.Fn-01: Auto power off (Enabled/Disabled)

2) C.Fn-06: Quick flash w/continuous shot (Disabled/ Enabled)

3) C.Fn-10: Slave auto power off timer (60 minutes/10 minutes)

4) C.Fn-11: Slave auto power off cancel (Within 8 hours/ Within 1 hour)
Back to Top
Power Source
1) Four size-AA/LR6 alkaline batteries are used. Ni-MH or lithium batteries can also be used.

2) This Speedlite is equipped with a power-saving function that turns off the power after 90 seconds if no operations are made.
External Power Source
External power supply accessories cannot be used.
Dimensions
Approx. 2.8 x 4.5 x 3.1 in./70.0 x 115.0 x 78.4mm
Weight
9.7 oz. / 275g


I hope this review served it's purpose and that you enjoyed it. If you have any questions, comments, or answers please write them in the comments below so others cans see them. Feel free to email me at anytime about my photography and remember to SUBSCRIBE!

Keep on Snappin',
ravimi

Tuesday, June 12, 2012

Photo TIPS! ~ Aperture and DOF

In the last post (Photo TIPS! ~ Aperture) I talked about the effects of changing the Aperture and how that is related to the amount of light being received by the Camera sensor. If you haven't yet, I recommend you read that post before continuing any further (only if you do not understand the subject well). Now back to the show.

When Changing the size of the Aperture the amount of light entering the lens changes; as the f/stop increases the size of the aperture decreases and the less light enters the lens. As the f/stop decreases the size of the Aperture increases; therefore, the amount of light reaching the sensor increases. But what else does it do? The lens itself acts a lot like an eyeball; the light enters the lens through the aperture and begins to move towards the center of the lens forming a cone. The tip of the cone forms in the middle of the lens and then begins to open up again to form another cone, as shown in the pictures below. (Please excuse the poor drawings lol, I did it myself in Paint.)


The 1st picture represents a lens with a very wide Aperture (very low f/stop) and the 2nd image is the reverse: a very small Aperture (very high f/stop). The little squares inside the lens that have the diagonal lines entering them determine the size of the Depth of Field. When the Aperture is very large (low f/stop) then the boxes (represented in the 1st image) have to be close to each other in order to maintain the path of light traveling within thems. When the Aperture is very small (high f/stop) then the boxes (represented by the 2nd image) have to be far apart in order to capture the amount of light entering.


EXTRA INFO: The reason the boxes change position is because they have to compensate for the size of the cone shaped light entering through the Aperture. The boxes aim to be as full as possible with light; notice how the small boxes have the lines (that represent the light) always close to the outer extremities of the box.

The further apart the boxes are from each other the more in-focused objects will appear in the image at different distances. The area between the boxes is what I refer to as the "Area of DOF" or "DOF field" (kinda redundant lol). The size of this area changes with the Aperture because the Aperture affects the size of the cone of light entering the lens, and the width of that cone of light determines where the boxes that create the "area of DOF" will be located. All of these things are related, and the more you begin to understand that the more your skills as a photographer will develop.

If you have questions, comments, or answers please make sure to leave a comment below or send me an email. I hope this post served it's purpose and that you have a better understanding on the subject. Please be sure to send this to as many people as possible; a couple of photographers I know in different experience levels do not understand this; they might understand how to change Aperture and what effects it has but they don't know WHY it has those effects (in other words, they do not know what is happening inside the lens. Thank you for reading.

Keep on Snappin'
Ravimi

Monday, June 11, 2012

Photo TIPS! ~ Aperture

I've been asked by a lot of new (and even some experienced) photographers, "what is Aperture?". This subject seems to be one of those things that you either understand completely or not at all, so I will try my best to explain it in a way that everyone will understand: Using my own pictures, and also word explanation.


WARNING: I'm going to be repeating a lot of words in order to make memorization more effective so please be a little tolerant (the repetition will help you understand the subject).


When thinking of Aperture try to imagine (as an example) the hole on one of the ends of a toilet paper roll. 

Image courtesy of Google (drawings are mine)
The inside of the lens is represented by the entire tube, and the Aperture is the actual hole as seen in the image above. The Aperture ("eye") of the lens takes in light that is interpreted by the camera sensor. Now, what does it mean when photographers say, "Hey, you! Change the Aperture?" They are referring to the size of the hole ("eye") in the front of the lens, and by "Change the Aperture" they want you to make the hole bigger or smaller. The image below shows how the size of the Aperture on the lens changes:

Aperture Table (courtesy of Google images)
Different lenses have different capabilities when it comes to how wide it can open (shown by figure f/2 in the image) and how much it can close (shown by f/16 in the image above). In the image, f/2 represents the widest the lens can open its "eye" (Aperture). As you start increasing the number, the amount of light reaching the sensor decreases because the "eye lids" (represented by the blades seen from f/2.8 - f/16) begin to close on the "eye" (aperture) of the lens. Why?
Camera manufactures use the f/stop (f/1, f/2, f2.8...) to indicate the amount of light reaching the sensor. When you have a lens that can reach f/1 then you have a lens that allows ALL of the light reach the sensor in the camera. So imagine the #1 in f/1 represents 100% light-to-sensor ratio. As the size of the f/stop (remember the "stop" in f/stop is replaced by numbers like f/1, f/2.8, f/5.6) increases the less light will reach the sensor (light to sensor). 

What does increasing the f/stop (Smaller Aperture) do to images? 2 things.

1) By increasing the number of the f/stop (the more shut the "eye lids" will be) the less light will reach the sensor; which results, in darker images. Why would I want less light to reach the sensor? Well Imagine it's an EXTREMELY sunny day and all your shots come out looking like your subject is a white piece of paper 2 inches from the camera (everything is to bright). By decreasing the amount of light ( a.k.a increasing f/stop) your image will look better because less of that EXTREMELY bright sun light is entering the lens and the more of the subject you will see. (try it out)
2) The more you increase the f/stop # the more background will be in focus, which is often used in landscape photography. I will explain this relationship between aperture and dop( depth of field) in the next "Photo TIPS!" tutorial.

What does decreasing the f/stop (Bigger Aperture) do to images? 2 things.

1) By decreasing the f/stop # (the more open the "eye" will be) the more light will reach the sensor. This is useful for when you are shooting in very dark places. By decreasing the f/stop the more light in the surroundings will enter the lens and the more visible your subject will become. 
2) The smaller you make the f/stop the less background will be in focus. This is something I use VERY often in my own photography, especially in my portrait photography. This is used when you want to create "Bokeh" which refers to the smooth background. I will also talk more about this effect in the next "Photo TIPS!" post. This effect also creates a pop in the image since only a small portion of the image is "in focus".

I used a very small f/stop number (f.2.8) in this
image which cause the amount of focus to be a
very small space (the focus was on the eyeball)
and it also caused the background to blur, i.e
BOKEH
This image also contains a small f/stop # (f/1.8)
and the focus is right on the glasses and lips.
(if you look closely you will see my reflection
on the glasses :))
-Big f/stop # = small aperture size and very little light reaching sensor (darker images)
-Small f/stop # = big aperture size and very much light reaching the sensor (brighter images)

If you have any questions about my pictures, posts, or photography over all, send me a message or comment below (comments are preferred since they may serve the purpose of answering the question for everyone with similar questions.) If you like this post please tell me below and share it on your social media sites, and remember SUBSCRIBE! 

Keep Snappin',
ravimi

Saturday, June 9, 2012

One of those Randoms! - More Poem Posters

Here are all the posters with poems on them that I've made so far. These are only 15% of the actual file sizes, but I'm thinking of maybe selling them soon in full size prints.


Keep on Snappin',

ravimi

Friday, June 8, 2012

One of those Randoms! ~ New Ideas

So I've been told by a lot of friends that my pictures would look AWESOME with quotes on them, so I decide, WHY NOT! I liked the idea so I'm gonna see how the community reacts to it (so far; very well). If you have a favorite picture from my collection (you can view my pictures on my website ravimiphotography.photoshelter.com) or would really like to see one of my pictures with your favorite quote on it then write the quote in the comments (or send me a PM) with a link to the picture you chose from my galleries ( or just give me the pictures name). PLEASE make sure the quote is correctly worded and cited (I just need the name of the person who made the quote, or the movie [if said in a movie]).


Keep Snappin', 
ravimi

Photo TIPS! ~ Negative Space

Today I'm going to be talking about something I love to use in my photography, Negative Space! Negative space refers to any space in an image that....that's it!; "any space in an image!"
Some people might disagree with that extremely tiny definition, and I understand why they would. Negative space can be used in MANY ways and can become anything within the frame of the photograph. I'll try to explain this with some of my photography (Nothing better than actual examples!) :

This image uses a lot of negative space to
support the themes: smoothness, creamy
delightful. The negative space is that creamy
looking space surrounding the flower.
The effect of blurring the background is termed
BOKEH! (Boe-Keh)

In a lot of my pictures I move the subject
to a corner of the frame. By doing so, I
fill the frame with empty space and this
space represents the "Negative space" in
the image. I used Negative space to show
the Habitat of the bird and also to highlight
the beautiful blue colors it has and how it
almost blends with the water.

The "Negative Space" in this image is
used to portray the themes: desolate, not
of nature. By allowing more of the sky to
appear the viewer might notice how the smoke
from the factory starts to disappear into the
sky, what does that make you think? 

Negative space here also creates a sense
of separation/loneliness and some may
interpret it differently (that's one beauties
of "Negative Space", it is free).  In this image
the negative space represented by the light
grey (a lake) also takes form.***
 ***The reason I gave negative space such a small definition is because it has such immense possibilities that I doubt I would be capable of truly defining it for the Universe. One of the ways it can be used is as the actual focus of the image, how? By boxing (more like fitting) it into a frame. Notice how the picture above shows a light grey space, that is a lake. The hills in the image were used to "box in" the lake, I gave it a form. By giving it a form I am able to use it for a purpose other than a nice light shade of grey in the image; the light background was used to highlight the head of the bird; "The Crown". By doing so, I gave the bird a specific personality, which I intended to be ....... (you tell me.)
This is one of my favorite uses of "Negative
Space". It can be used to give a dramatic
push to a theme or a persons personality.
My friend (the guy in this image) is a goofy
guy, but he is also very smart and seems
to enjoy thinking so I decided to capture
that part of his personality.
If you have any questions about my pictures, posts, or photography over all send me a message or comment below (comments are preferred since they may serve the purpose of answering the question for everyone with similar questions.) If you like this post please tell me below and share it on your social media sites, and remember SUBSCRIBE! 

Keep Snappin',


ravimi

Thursday, June 7, 2012

One of those Randoms! ~ "The Golden Hours" follow up

So we have another new member on the RPB!! Their name is "Christian Udarbe" and I would like to welcome you on our journey with photography. I read your (Christian Udarbe) comment on "The Golden Hours" post and it gave me an awesome idea.

IDEA: I would like to invite all the photographers who read this to submit 1 photo (each) with the theme "The Golden Hours". This means that the picture has to be taken during the time of day where the sun is either rising or setting (no limitations on what the subject is; it can be a portrait, it just has to be on that time of day). Feel free to add a signature anywhere on your own picture BUT refrain from messing it up (don't clutter the image with signatures, this includes logos, or I will not post it). You can submit the picture to my email ravimiart@gmail.com AND please make sure the longest side of the image is at least 800 pixels. Thanks for your time and remember to SUBSCRIBE!

Keep Snappin,'
ravimi

Wednesday, June 6, 2012

Photo TIPS! ~ Fill Light

Today I will be talking about Fill Light! The last post talked about "The Golden Hours" (pretty holy stuff) and I mentioned fill light when talking about the effects of the morning and evening sunlight (The Golden Hours). The light from these times of day seems to envelope the subject from multiple directs because the main light (sun light) is not so powerful as too outmatch the Fill light. Well, what is fill light?

Fill light is soft (softer than the main light) light that is used to expose the features of a subject that might be hidden by the shadows created by the main light (the main source of where the light is coming from, ex: sunlight, light bulb, etc.). In portrait photography fill light very often comes from a reflector.

This is a light reflector. It is positioned at an angle
that will help redirect the light (that is not heading towards
the subject) towards the subject. This will help light up
multiple sides of the object. 

A reflector can be many things: a wall (preferably light colored walls, dark colors absorb to much of the light unless the subject is right against the wall), a table, a ceiling, and many other surfaces that redirect light in a desired direction. 

Some photographers use flashes in order to create fill light. Flashes can be positioned in multiple angles, and some can even be shot independent of the actual camera. One example of using Flash as fill light is when I took the picture of the baby below. This picture was taken under a 10x10 beach tent at night. I did not want to much light coming from one direction to hit the babies face so I angled the flash directly upwards. By doing so, the light from the flash bounced off the tent's ceiling and so the entire tent became a huge light box. By examining the picture you will see little, too none, notable shadows that are over powering (the background is dark because I took this outside during the night and so the amount of light inside the tent drained out the visible objects in the background, and a low f/stop also helped). 


Bounce light is VERY useful, especially during portrait photography. So make sure to be aware of it's usefulness and how to best control it. Observe your surroundings for possible "reflectors" (i.e. walls, tables, flat surfaces) and be creative with light sources and when to take pictures (refer to my "The Golden Hours" post).

If you have any questions about my pictures, posts, or photography over all send me a message or comment below (comments are preferred since they may serve the purpose of answering the question for everyone with similar questions.) and remember SUBSCRIBE!

Keep Snappin',ravimi

Tuesday, June 5, 2012

Photo TIPS! ~ "The Golden Hours"

First I would like to start off by welcoming the first ever follower of RPB (Ravimi Photography Blog) "TheLittlePictureBox"! Yay (fireworks in the background, while drunk people fall over from the after after after party). Thanks for joining me on the journey through photography!

Now back to the normally scheduled program. Today I would like to discuss "The Golden Hours" which I referred to in the last "Photo and Personal Style" post. The Golden Hours refers to a time of day in which photographers in the photography community (I know, redundant) generally have dubbed "The best time of the day for taking pictures". The reason for the nice title is because it's a time when the sun gives off it's most vibrant light. This time is from when the sun rises to about 9-10am, and when the sun is setting, mostly the period after 5pm (lol, sorry Alaska), to when it is completely gone. I'm sure a lot of you, if not all, have seen a picture of the sunset/sunrise, it contains vibrant colors that shine beautifully which is one of the reasons it is so greatly praised.

This is one of my Sunset pictures, taken on Christmas day.
During "The Golden Hours" the sun light can be strong but it is coming from an angled direction that is not directly above. Sunlight during the middle of the day, in most cases, is very harsh and may cause pictures to look bleached out (over exposed) even when the settings have been adjusted. The reason for this is because shadows created by the harsh light creates too much of a contrast which will make skin exposed to the light look "washed out" relative to the darkness of the skin that is covered by shadows. I would describe this effect similar to that of a camera trying to take video of a dark subject while there is a light reflector surrounding the subject and is pointing directly at the lens. Midday light comes directly from above which is not always forgiving towards the person being photographed. The example picture of the foot prints below (Image is called "Bajo Relieve") shows how shadows from the Golden hours can be used, and how midday sun can actually destroy interesting shadows.

The light of "The Golden Hours" comes from a lower angle and this allows the photographer to dictate where the model will stand for the best exposure. The less-harsh light seems to wrap around the subject because there is very little contrast between the actual direct sunlight and fill light (light that is reflected from surfaces or comes from other mediums with the purpose of lowering the amount of contrast created by the main source of light: in other words I'll leave it for a later tutorial). An example of this is the portrait below.

So be sure to use "The Golden Hours" as a very important tool. It serves as a great time of day when the sun creates favorable and colorful light, and is also the coolest part of the day (excluding night of course).


If you have any questions about my pictures or photography over all send me a message or comment below (comments are preferred since they may serve the purpose of answering the question for everyone with similar questions.) and remember SUBSCRIBE!
Keep Snappin',
ravimi


I took this in the afternoon when the sun was setting.
If I would have taken this during the middle of the day
the shadows that help create the feeling of the feet popping
out would not have been possible. 
As described above, the afternoon light from
"The Golden Hours" (so holy)
contains light that is not to strong and allows
the rest of the subjects face enough light
that the contrast wont be too noticeable.


Monday, June 4, 2012

Photo and Personal Style

This picture was part of  my first big profit job. The model wanted some pictures taken by me because he liked my personal philosophy of capturing the person for who they are, and he also enjoyed my pictures he had seen. Knowing his personality I decided it would be nice to have an outdoors photoshoot with strong colors (as shown by the strong blue sky and yellow shirt) and strong energy being radiated by the model. We went out to a nearby dock since it was far away from trees and buildings that could get in the way of the framing. We also started the shoot in the afternoon, around 5-6pm, so that the sun was close to the horizon while still maintaining enough light for the picture (this is referred to as the "Golden Hours", I will go over this in a future tutorial).

The model has a strong body figure, he is very fit and has had experience with modeling professionally so I decided to give him a look that showed his strength and inner power. I took the picture from below to make him appear larger than life and made sure that his elbows would not fall outside of the frame while maintaining a tight composition that also pushed the idea of his thin figure. The negative space (refers to the empty space) helps bring out the idea of internal strength/spiritual power (I will go over the use of Negative space in a future tutorial). And lastly I always made sure to help him give off a feeling of strength accompanied by a relaxed aura. 

If you have any questions about my pictures or photography over all send me a message or comment below (comments are preferred since they may serve the purpose of answering the question for everyone who sees it.)

Keep Snappin',
ravimi


    ISO 100
    1/2500 shutter speed
    2.8 Aperture
    50mm

   This is another picture I took that day.  
    ISO 100
    1/125 Shutter speed
    7.1 Aperture
    50mm
    

Sunday, June 3, 2012

Photo TIPS! ~ Photography Equipment; when to buy it.

When I started photography as a hobby (as something that I actually decided to give time too) I began with a Casio EX FH100.
Cool stuff :)

It's a point and shoot camera that I spent MONTHS researching because I had a budget, and I knew if I was going to buy something that I was going to make into a hobby then it was going to be the most bang for the buck. Anyways this camera served me well, so well it last me about 5 months. I'm not being sarcastic. This Point-n-Shoot camera opened the doors of the photographic world to me. I took it EVERYWHERE and for those 5 months I took more than  10 thousand pictures. I used it so much that I joined my schools yearbook team and actually became the unofficial school photographer [I was allowed to carry my camera in my hands and take pictures whenever I wanted without any words from the teachers. Cameras weren't allowed during school at my school (like cellphones) so it was kind of a biggish deal].

Now why does this matter to you? Well my point (no pun intended) is that even though I had a regular little Point-n-Shoot camera I used it as if I was using a top of the line piece of equipment. I used it knowing that I was not ready for the VERY (relatively) expensive  DSLR I now own, but I knew that when I would "outgrow" the PnS it would be time for me to go to the next level. That moment was 5 months after I got the Casio. I started feeling limited by the Aperture settings, the frame size, the speed, and lack of control I now understood I would have in a DSLR.

Awesome to own, but not so awesome for the pockets ;)
Cameras and photography equipment can be extremely expensive. It is very important to know when it is time to go to the next level, and sometimes even when that time comes you may not have the money for the equipment. So in order to make sure you have that money sooner rather than later, only buy things you know you will use very often and will chip away the limitations you feel are present.
Consider what the equipment will be used for, why you need it, if there is something that may serve the same purpose and cost cheaper, and if you will actually want to use it (this is a very big factor; the more you desire to use it, the more chances it has in paying for itself).

It's been almost a year and I now own a DSLR with 2 lenses, one cost me an amazing $125 dollars (canon 50mm 1.8 lens. Lenses can cost in the thousands so a very good lens for under $150 is amazing) and the other was given to me as a gift by another photographer. I also have a flash that cost me $250, but I also spent about 1.5 months researching flashes after I realized I needed one (especially since I was doing event photography at night for 2000 people).

Some examples of saving money on things you may need are:
-Use display boards as a reflector (can cost maybe $1) instead of a $30-$80 reflector.
-Use bed sheets as a background rather than using those expensive rolls of cloth (can cost a lot).
-Get a friends help during a photoshoot instead of paying for an assistant. I have a lot of friends that help me out and in return I take a couple of pictures of them and give it to them for free.
-If you get to the point where you want to show off your pictures to the world use free internet services like Facebook, Google+, and other places)
-Always have an eye on your surroundings, a piece of wood on the ground may serve as your next background, a piece of white paper can be used as a reflector, and even a couple of bricks can help raise your eye level without the need of a ladder.

If you have any questions, comments, or answers make sure to comment below or pop me an email.

I took this while standing on a brick.
The shadow under the flower is actually a fence so
I needed something to see over the fence.

Keep Snappin',
ravimi

Saturday, June 2, 2012

Photo and Personal Style

I took this today at my friends party. I love this image because of how much it shows the girls personality: huge amount of energy and wonderful smile. The details of the image are below the image, all the images I will be posting on this blog along with ALL the other places I post consist of photographs straight from the camera. I'm trying to build a name for myself as a straight out of camera photographer; some may call it crazy, others stupid (for valid reasons that I do understand), BUT I have decided this path therefore I will follow it, and so far it has worked to my expectations, and beyond. Also! please forgive me for grammar mistakes and everything else haha, English grammar is not my forte.

If you have any questions about my pictures or photography over all send me a message or comment below (comments are preferred since they may serve the purpose of answering the question for everyone who sees it.) 

Keep Snappin',
ravimi
ISO 100
1/320 shutter speed
2.5 Aperture
50mm
Sepia

Photography