Showing posts with label light. Show all posts

Monday, June 11, 2012

Photo TIPS! ~ Aperture

I've been asked by a lot of new (and even some experienced) photographers, "what is Aperture?". This subject seems to be one of those things that you either understand completely or not at all, so I will try my best to explain it in a way that everyone will understand: Using my own pictures, and also word explanation.


WARNING: I'm going to be repeating a lot of words in order to make memorization more effective so please be a little tolerant (the repetition will help you understand the subject).


When thinking of Aperture try to imagine (as an example) the hole on one of the ends of a toilet paper roll. 

Image courtesy of Google (drawings are mine)
The inside of the lens is represented by the entire tube, and the Aperture is the actual hole as seen in the image above. The Aperture ("eye") of the lens takes in light that is interpreted by the camera sensor. Now, what does it mean when photographers say, "Hey, you! Change the Aperture?" They are referring to the size of the hole ("eye") in the front of the lens, and by "Change the Aperture" they want you to make the hole bigger or smaller. The image below shows how the size of the Aperture on the lens changes:

Aperture Table (courtesy of Google images)
Different lenses have different capabilities when it comes to how wide it can open (shown by figure f/2 in the image) and how much it can close (shown by f/16 in the image above). In the image, f/2 represents the widest the lens can open its "eye" (Aperture). As you start increasing the number, the amount of light reaching the sensor decreases because the "eye lids" (represented by the blades seen from f/2.8 - f/16) begin to close on the "eye" (aperture) of the lens. Why?
Camera manufactures use the f/stop (f/1, f/2, f2.8...) to indicate the amount of light reaching the sensor. When you have a lens that can reach f/1 then you have a lens that allows ALL of the light reach the sensor in the camera. So imagine the #1 in f/1 represents 100% light-to-sensor ratio. As the size of the f/stop (remember the "stop" in f/stop is replaced by numbers like f/1, f/2.8, f/5.6) increases the less light will reach the sensor (light to sensor). 

What does increasing the f/stop (Smaller Aperture) do to images? 2 things.

1) By increasing the number of the f/stop (the more shut the "eye lids" will be) the less light will reach the sensor; which results, in darker images. Why would I want less light to reach the sensor? Well Imagine it's an EXTREMELY sunny day and all your shots come out looking like your subject is a white piece of paper 2 inches from the camera (everything is to bright). By decreasing the amount of light ( a.k.a increasing f/stop) your image will look better because less of that EXTREMELY bright sun light is entering the lens and the more of the subject you will see. (try it out)
2) The more you increase the f/stop # the more background will be in focus, which is often used in landscape photography. I will explain this relationship between aperture and dop( depth of field) in the next "Photo TIPS!" tutorial.

What does decreasing the f/stop (Bigger Aperture) do to images? 2 things.

1) By decreasing the f/stop # (the more open the "eye" will be) the more light will reach the sensor. This is useful for when you are shooting in very dark places. By decreasing the f/stop the more light in the surroundings will enter the lens and the more visible your subject will become. 
2) The smaller you make the f/stop the less background will be in focus. This is something I use VERY often in my own photography, especially in my portrait photography. This is used when you want to create "Bokeh" which refers to the smooth background. I will also talk more about this effect in the next "Photo TIPS!" post. This effect also creates a pop in the image since only a small portion of the image is "in focus".

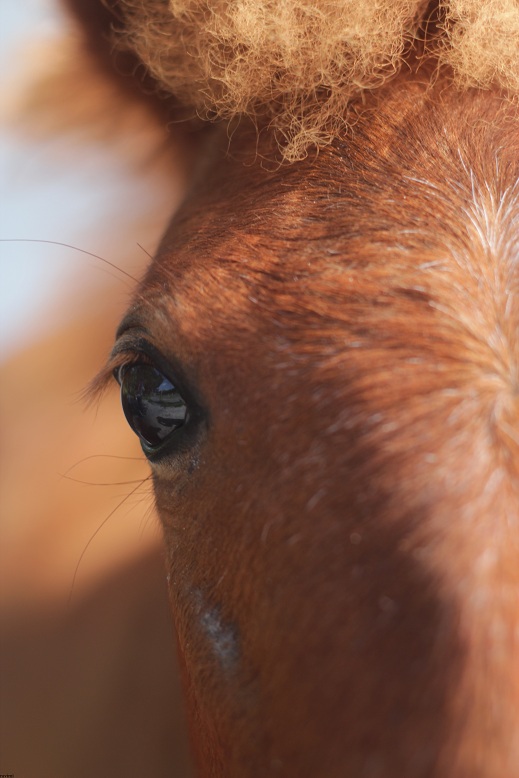
I used a very small f/stop number (f.2.8) in this
image which cause the amount of focus to be a
very small space (the focus was on the eyeball)
and it also caused the background to blur, i.e
BOKEH
This image also contains a small f/stop # (f/1.8)
and the focus is right on the glasses and lips.
(if you look closely you will see my reflection
on the glasses :))
-Big f/stop # = small aperture size and very little light reaching sensor (darker images)
-Small f/stop # = big aperture size and very much light reaching the sensor (brighter images)

If you have any questions about my pictures, posts, or photography over all, send me a message or comment below (comments are preferred since they may serve the purpose of answering the question for everyone with similar questions.) If you like this post please tell me below and share it on your social media sites, and remember SUBSCRIBE! 

Keep Snappin',
ravimi

Wednesday, June 6, 2012

Photo TIPS! ~ Fill Light

Today I will be talking about Fill Light! The last post talked about "The Golden Hours" (pretty holy stuff) and I mentioned fill light when talking about the effects of the morning and evening sunlight (The Golden Hours). The light from these times of day seems to envelope the subject from multiple directs because the main light (sun light) is not so powerful as too outmatch the Fill light. Well, what is fill light?

Fill light is soft (softer than the main light) light that is used to expose the features of a subject that might be hidden by the shadows created by the main light (the main source of where the light is coming from, ex: sunlight, light bulb, etc.). In portrait photography fill light very often comes from a reflector.

This is a light reflector. It is positioned at an angle
that will help redirect the light (that is not heading towards
the subject) towards the subject. This will help light up
multiple sides of the object. 

A reflector can be many things: a wall (preferably light colored walls, dark colors absorb to much of the light unless the subject is right against the wall), a table, a ceiling, and many other surfaces that redirect light in a desired direction. 

Some photographers use flashes in order to create fill light. Flashes can be positioned in multiple angles, and some can even be shot independent of the actual camera. One example of using Flash as fill light is when I took the picture of the baby below. This picture was taken under a 10x10 beach tent at night. I did not want to much light coming from one direction to hit the babies face so I angled the flash directly upwards. By doing so, the light from the flash bounced off the tent's ceiling and so the entire tent became a huge light box. By examining the picture you will see little, too none, notable shadows that are over powering (the background is dark because I took this outside during the night and so the amount of light inside the tent drained out the visible objects in the background, and a low f/stop also helped). 


Bounce light is VERY useful, especially during portrait photography. So make sure to be aware of it's usefulness and how to best control it. Observe your surroundings for possible "reflectors" (i.e. walls, tables, flat surfaces) and be creative with light sources and when to take pictures (refer to my "The Golden Hours" post).

If you have any questions about my pictures, posts, or photography over all send me a message or comment below (comments are preferred since they may serve the purpose of answering the question for everyone with similar questions.) and remember SUBSCRIBE!

Keep Snappin',ravimi

Tuesday, June 5, 2012

Photo TIPS! ~ "The Golden Hours"

First I would like to start off by welcoming the first ever follower of RPB (Ravimi Photography Blog) "TheLittlePictureBox"! Yay (fireworks in the background, while drunk people fall over from the after after after party). Thanks for joining me on the journey through photography!

Now back to the normally scheduled program. Today I would like to discuss "The Golden Hours" which I referred to in the last "Photo and Personal Style" post. The Golden Hours refers to a time of day in which photographers in the photography community (I know, redundant) generally have dubbed "The best time of the day for taking pictures". The reason for the nice title is because it's a time when the sun gives off it's most vibrant light. This time is from when the sun rises to about 9-10am, and when the sun is setting, mostly the period after 5pm (lol, sorry Alaska), to when it is completely gone. I'm sure a lot of you, if not all, have seen a picture of the sunset/sunrise, it contains vibrant colors that shine beautifully which is one of the reasons it is so greatly praised.

This is one of my Sunset pictures, taken on Christmas day.
During "The Golden Hours" the sun light can be strong but it is coming from an angled direction that is not directly above. Sunlight during the middle of the day, in most cases, is very harsh and may cause pictures to look bleached out (over exposed) even when the settings have been adjusted. The reason for this is because shadows created by the harsh light creates too much of a contrast which will make skin exposed to the light look "washed out" relative to the darkness of the skin that is covered by shadows. I would describe this effect similar to that of a camera trying to take video of a dark subject while there is a light reflector surrounding the subject and is pointing directly at the lens. Midday light comes directly from above which is not always forgiving towards the person being photographed. The example picture of the foot prints below (Image is called "Bajo Relieve") shows how shadows from the Golden hours can be used, and how midday sun can actually destroy interesting shadows.

The light of "The Golden Hours" comes from a lower angle and this allows the photographer to dictate where the model will stand for the best exposure. The less-harsh light seems to wrap around the subject because there is very little contrast between the actual direct sunlight and fill light (light that is reflected from surfaces or comes from other mediums with the purpose of lowering the amount of contrast created by the main source of light: in other words I'll leave it for a later tutorial). An example of this is the portrait below.

So be sure to use "The Golden Hours" as a very important tool. It serves as a great time of day when the sun creates favorable and colorful light, and is also the coolest part of the day (excluding night of course).


If you have any questions about my pictures or photography over all send me a message or comment below (comments are preferred since they may serve the purpose of answering the question for everyone with similar questions.) and remember SUBSCRIBE!
Keep Snappin',
ravimi


I took this in the afternoon when the sun was setting.
If I would have taken this during the middle of the day
the shadows that help create the feeling of the feet popping
out would not have been possible. 
As described above, the afternoon light from
"The Golden Hours" (so holy)
contains light that is not to strong and allows
the rest of the subjects face enough light
that the contrast wont be too noticeable.


Saturday, June 2, 2012

Photo TIPS! ~ Histogram!

The Histogram is that little graph that pops up on your camera screen when looking at the photographs information; looks something like this:
Histogram

The Histogram is used to measure how much or how little light there is in an image. To read the histogram you start from the left side which has a value of 0 (lowest value) and from the left you move towards the right which has a value of 255(highest). If an image has a lot of that black shadow (content that looks like a mountain range shown in the image above) on the left half of the Histogram then the image is most likely underexposed (which means there is not enough light in the image).
This histogram reflects an image with a lot of shadows (very dark)
If the black shadow is on the right side of the image then it means it is most likely overexposed (which means there is too much light in the image and may lead to detail loss).
This histogram reflects an image with a  lot of light (very bright)

One of the main goals of a photographer when taking pictures is to create correctly exposed images (imagine if you're shooting for a wedding and most of the images are underexposed, AND you don't know how to correct it on the PC!!! Trouble.). As some of you might have already guessed the best way to have a correctly exposed image is to maintain the black shadow of the histogram between the 0 and 255 values, as shown in the first image above with the caption "Histogram".
This image has a histogram that looks similar to the first image,
 but with more black shade on the right half;
Question, can you guess why there is more shade on the right? 
The Histogram is VERY important when measuring an images exposure and can be more reliable than the LCD screen because an underexposed image may look ok when looking at the LCD in the sun. Avoid those little mistakes and make the Histogram a familiar tool.
If you have any questions/comments go ahead and comment below or send me a message to my email ravimiart@gmail.com


Keep Snappin',
ravimi

Photography