Showing posts with label photography. Show all posts

Tuesday, June 24, 2014

Con-Artist

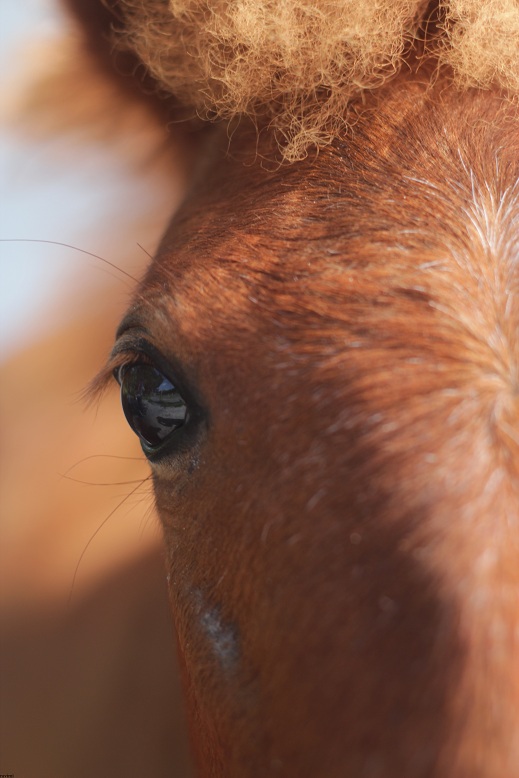
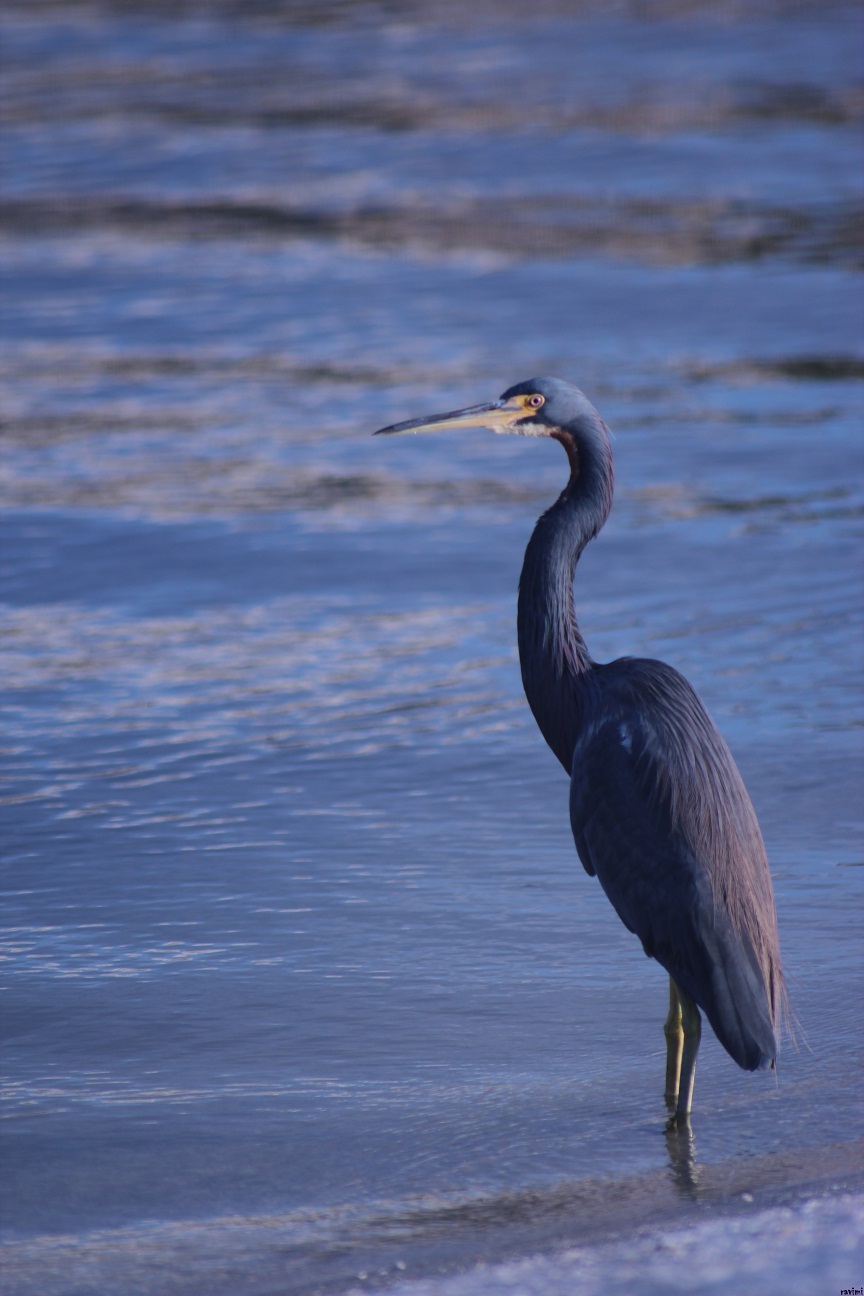
Photographers take pictures of the world and its properties and make them art by adding elements to the image that inspire human emotion. The art of photography is not capturing what is (in terms of nature), but what is to us [humans/the mind]… and with that, we con.

We are conartists.

A landscape becomes beautiful because it looks, and afterwards feels, natural (within the context of human interpretation). A portrait is simply an image of a person, but in the eyes of some it can become art when the artist is capable of using their skill to help the 2-dimensional image (the portrait) transcend a physical meaning into a physiological dimension (the mind) - by this point, instilling emotion.

These are such big words for such a simple process of composing the frame around a subject and then pressing the shutter button. But this is exactly what research in photography covers: the relationship to the images we create and even more obscure topics that include the study of diaspora relating to the artist and even more obscure topics like the relationship between an object and its name. 


I personally judge the greatness of my art, and vice versa, on the depth of its content. Some of my art is only meant to represent a small puddle for the viewer to cool off in after being in the hot sun that is the social world (sometimes, even our own minds). But some of the other works I've composed represent much more than a little trickle of water; my deeper work is meant to be a spring, a spring that gushes inspiration from its origins and whets the appetite of the viewer but makes them desire more once they realize how much there is left to experience. 

I'm still a toddler in this world of thought, but that won't stop me from writhing out of the muck and reaching for the stars in that dark yet profound sky that is the mind and the world around it. Each step forward consists of experiences, and with each experience I'll be there with a camera at hand to photograph what I see, as well as inadvertently marking where I currently am, and, eventually, where I was.

My goal as an artist is to experience. To grow and create a physical representation of the metaphysical thoughts within my mind, and others. I hope to create images that resurrect the soul out from the daily miasma that sinks us into lifeless repetition and brings forth a human with desire for more out of themselves. 

Escape the voluntary prison
I hope to do many things - that is part of being young - but even that thought is a trap because the older minds aren't lacking of curiosity. We may find insecurity when dealing with obscurity but everything was once obscure; water was once a mystery to our minds, but once we quenched our thirst with it, it was no longer obscure and had now become secure in our minds as a source of life and continuation. 

The only security I have in my photography is my camera and my skill; that is the exact reason why I don't edit my own photography and only use my camera's computer to process it. Everything else is obscure, but within that I'll find the solid path and that alone is enough to inspire me.

Work alongside life

Thursday, April 3, 2014

Las Manos: Portraits through the hands


One of the subjects most discussed in photography, especially in contemporary photography, is that of “Identity.” After reading several articles that blew me away (because of their depth and detail), I realized I had found the second path that I've been looking for within the past year that would lead me to the next chapter of my work- context.

Well, I wanted to sound dramatic there; hopefully it worked! But, honestly, I did encounter what I felt I was missing. My work, no matter how good it was (relative to the past few years), lacked definition, context (that word again).


What does context mean?   in my case...

It refers to the relationship between the viewer and my images. For the past few years, I've been working exclusively and intentionally on building a strong, capable, photographic skill base. My focus was solely on composing (correctly), lighting (correctly), and vision (being able to discriminate between good and bad shots before even lifting the camera to my face). And these basics (composition, lighting, vision) will always be works in progress, no matter how skilled I get. But now I'm slowly expanding my work by bringing meaning and audience into the frame. (I'm such a punster).


Because of my new academic involvements I've started thinking, "Why not give my work a deeper, more intentional meaning?" So this is the first blog [actually, the second, lol. The previous post was the first] about such attempts. Except I will supply one element that has been referred to in the past couple paragraphs:

Context

This collection was originally focused on just getting nifty-looking pictures (remember, I was only focused on building a base)...But, with new intentions, I'm adding some meaning to this collection. This post covers Identity, through people’s hands. The title, "Las Manos" (Spanish for “The Hands”) refers to a collection I started in Cuba on my last visit. I wanted to express the value our hands hold in our lives. Hands produce action from our thoughts; and from action they produce character, Identity.


Las Manos

Born and raised in Cuba. 


These next images of "Las Manos" are accompanied by a portrait of the contributor. (cover image too)


--------------------------------------------------------------------------


--------------------------------------------------------------------------


--------------------------------------------------------------------------


--------------------------------------------------------------------------


We do so much with these extremities that we sometimes don't actually realize how often we use them. Every day we use them to get out of bed, each finger wraps around the handle of a brush to brush our teeth, to straighten our hair. We prepare our meals with our hands, or simply use them to accept the meals prepared by the hands of others. We use them to determine how we feel: forehead hot; sweat down the neck; cold. And we also use them to express our feelings: hands over our eyes – fear; hands against the cheek of someone else – Love.....or anger. 
   

So don’t simply do, but feel and observe your actions, because after the actions are done they belong to your past and ultimately our past actions build our future as well. 


Ravimi

Monday, July 2, 2012

One of those Randoms! ~ "Parade!"

So I've been out for a while because of a summer program I was a staff member at and other events (after the summer program) that I wanted to photograph and use as my back-on-track photos (so I avoided posting before then). So this post will be dedicated to showing some of the best pictures I took on that event, which happened to be the annual St. Pete Pride Parade! I hope you enjoy and if you want to see more just visit my website.

Remember to SUBSCRIBE! and share this with your other friends if you like it. If you have any questions feel free to leave a comment or send me an email.

Keep on Snappin',
Ravimi

***Update: We also have a new SUBSCRIBER!!!! (rockets shoot into the air while elephants run off cliffs and land on trampolines that launch them over the moon). Thank you Horacio for joining us on RPB!

ISO 100
1/400 Shutter Speed
5 Aperture
50mm
ISO 100
1/1000 Shutter Speed
5.6 Aperture
50mm
ISO 100
1/320 Shutter Speed
5.6 Aperture
50mm
ISO 100
1/320 Shutter Speed
5.6 Aperture
50mm
ISO 100
1/1000 Shutter Speed
5.6 Aperture
50mm

Sunday, June 17, 2012

Photo and Personal Style ~ Continuation

Here are some more pictures I've taken! I hope you enjoy.

ISO 100
1/1250 Shutter Speed
2.5 Aperture
50 mm 
ISO 100
1/4000 Shutter Speed
5.6 Aperture
300mm 
ISO 100
1/4000 Shutter Speed
5.6 Aperture
300mm 
ISO 100
1/4000 Shutter Speed
4.0 Aperture
75mm 
ISO 200
1/125 Shutter Speed
4.5 Aperture
50mm 
ISO 200
1/125 Shutter Speed
6.3 Aperture
50mm 
ISO 100
1/250 Shutter Speed
13 Aperture
50mm 
ISO 100
1/400 Shutter Speed
5.6 Aperture
300mm 
ISO 100
1/200 Shutter Speed
5.6 Aperture
300mm 
Keep on Snappin',

Ravimi

Friday, June 15, 2012

Contests! "Free and Worthy 7"

So I've decided to start a post based only on Contests. I will Try and do one of these posts on a monthly basis. The post will contain a list of 7 contests that are, as the title states, "Free (no fee to apply) and Worthy (prizes are worth the investment)". I hope you like these posts, if you do make sure to share them with your friends.

CONTEST LIST


If you know of any other contests let me know and if I find it "Free and Worthy" I will post on the next contest post with your name/username being referenced (unless asked not too).

Keep on Snappin',
Ravimi   

Monday, June 11, 2012

Photo TIPS! ~ Aperture

I've been asked by a lot of new (and even some experienced) photographers, "what is Aperture?". This subject seems to be one of those things that you either understand completely or not at all, so I will try my best to explain it in a way that everyone will understand: Using my own pictures, and also word explanation.


WARNING: I'm going to be repeating a lot of words in order to make memorization more effective so please be a little tolerant (the repetition will help you understand the subject).


When thinking of Aperture try to imagine (as an example) the hole on one of the ends of a toilet paper roll. 

Image courtesy of Google (drawings are mine)
The inside of the lens is represented by the entire tube, and the Aperture is the actual hole as seen in the image above. The Aperture ("eye") of the lens takes in light that is interpreted by the camera sensor. Now, what does it mean when photographers say, "Hey, you! Change the Aperture?" They are referring to the size of the hole ("eye") in the front of the lens, and by "Change the Aperture" they want you to make the hole bigger or smaller. The image below shows how the size of the Aperture on the lens changes:

Aperture Table (courtesy of Google images)
Different lenses have different capabilities when it comes to how wide it can open (shown by figure f/2 in the image) and how much it can close (shown by f/16 in the image above). In the image, f/2 represents the widest the lens can open its "eye" (Aperture). As you start increasing the number, the amount of light reaching the sensor decreases because the "eye lids" (represented by the blades seen from f/2.8 - f/16) begin to close on the "eye" (aperture) of the lens. Why?
Camera manufactures use the f/stop (f/1, f/2, f2.8...) to indicate the amount of light reaching the sensor. When you have a lens that can reach f/1 then you have a lens that allows ALL of the light reach the sensor in the camera. So imagine the #1 in f/1 represents 100% light-to-sensor ratio. As the size of the f/stop (remember the "stop" in f/stop is replaced by numbers like f/1, f/2.8, f/5.6) increases the less light will reach the sensor (light to sensor). 

What does increasing the f/stop (Smaller Aperture) do to images? 2 things.

1) By increasing the number of the f/stop (the more shut the "eye lids" will be) the less light will reach the sensor; which results, in darker images. Why would I want less light to reach the sensor? Well Imagine it's an EXTREMELY sunny day and all your shots come out looking like your subject is a white piece of paper 2 inches from the camera (everything is to bright). By decreasing the amount of light ( a.k.a increasing f/stop) your image will look better because less of that EXTREMELY bright sun light is entering the lens and the more of the subject you will see. (try it out)
2) The more you increase the f/stop # the more background will be in focus, which is often used in landscape photography. I will explain this relationship between aperture and dop( depth of field) in the next "Photo TIPS!" tutorial.

What does decreasing the f/stop (Bigger Aperture) do to images? 2 things.

1) By decreasing the f/stop # (the more open the "eye" will be) the more light will reach the sensor. This is useful for when you are shooting in very dark places. By decreasing the f/stop the more light in the surroundings will enter the lens and the more visible your subject will become. 
2) The smaller you make the f/stop the less background will be in focus. This is something I use VERY often in my own photography, especially in my portrait photography. This is used when you want to create "Bokeh" which refers to the smooth background. I will also talk more about this effect in the next "Photo TIPS!" post. This effect also creates a pop in the image since only a small portion of the image is "in focus".

I used a very small f/stop number (f.2.8) in this
image which cause the amount of focus to be a
very small space (the focus was on the eyeball)
and it also caused the background to blur, i.e
BOKEH
This image also contains a small f/stop # (f/1.8)
and the focus is right on the glasses and lips.
(if you look closely you will see my reflection
on the glasses :))
-Big f/stop # = small aperture size and very little light reaching sensor (darker images)
-Small f/stop # = big aperture size and very much light reaching the sensor (brighter images)

If you have any questions about my pictures, posts, or photography over all, send me a message or comment below (comments are preferred since they may serve the purpose of answering the question for everyone with similar questions.) If you like this post please tell me below and share it on your social media sites, and remember SUBSCRIBE! 

Keep Snappin',
ravimi

Friday, June 8, 2012

Photo TIPS! ~ Negative Space

Today I'm going to be talking about something I love to use in my photography, Negative Space! Negative space refers to any space in an image that....that's it!; "any space in an image!"
Some people might disagree with that extremely tiny definition, and I understand why they would. Negative space can be used in MANY ways and can become anything within the frame of the photograph. I'll try to explain this with some of my photography (Nothing better than actual examples!) :

This image uses a lot of negative space to
support the themes: smoothness, creamy
delightful. The negative space is that creamy
looking space surrounding the flower.
The effect of blurring the background is termed
BOKEH! (Boe-Keh)

In a lot of my pictures I move the subject
to a corner of the frame. By doing so, I
fill the frame with empty space and this
space represents the "Negative space" in
the image. I used Negative space to show
the Habitat of the bird and also to highlight
the beautiful blue colors it has and how it
almost blends with the water.

The "Negative Space" in this image is
used to portray the themes: desolate, not
of nature. By allowing more of the sky to
appear the viewer might notice how the smoke
from the factory starts to disappear into the
sky, what does that make you think? 

Negative space here also creates a sense
of separation/loneliness and some may
interpret it differently (that's one beauties
of "Negative Space", it is free).  In this image
the negative space represented by the light
grey (a lake) also takes form.***
 ***The reason I gave negative space such a small definition is because it has such immense possibilities that I doubt I would be capable of truly defining it for the Universe. One of the ways it can be used is as the actual focus of the image, how? By boxing (more like fitting) it into a frame. Notice how the picture above shows a light grey space, that is a lake. The hills in the image were used to "box in" the lake, I gave it a form. By giving it a form I am able to use it for a purpose other than a nice light shade of grey in the image; the light background was used to highlight the head of the bird; "The Crown". By doing so, I gave the bird a specific personality, which I intended to be ....... (you tell me.)
This is one of my favorite uses of "Negative
Space". It can be used to give a dramatic
push to a theme or a persons personality.
My friend (the guy in this image) is a goofy
guy, but he is also very smart and seems
to enjoy thinking so I decided to capture
that part of his personality.
If you have any questions about my pictures, posts, or photography over all send me a message or comment below (comments are preferred since they may serve the purpose of answering the question for everyone with similar questions.) If you like this post please tell me below and share it on your social media sites, and remember SUBSCRIBE! 

Keep Snappin',


ravimi

Wednesday, June 6, 2012

Photo TIPS! ~ Fill Light

Today I will be talking about Fill Light! The last post talked about "The Golden Hours" (pretty holy stuff) and I mentioned fill light when talking about the effects of the morning and evening sunlight (The Golden Hours). The light from these times of day seems to envelope the subject from multiple directs because the main light (sun light) is not so powerful as too outmatch the Fill light. Well, what is fill light?

Fill light is soft (softer than the main light) light that is used to expose the features of a subject that might be hidden by the shadows created by the main light (the main source of where the light is coming from, ex: sunlight, light bulb, etc.). In portrait photography fill light very often comes from a reflector.

This is a light reflector. It is positioned at an angle
that will help redirect the light (that is not heading towards
the subject) towards the subject. This will help light up
multiple sides of the object. 

A reflector can be many things: a wall (preferably light colored walls, dark colors absorb to much of the light unless the subject is right against the wall), a table, a ceiling, and many other surfaces that redirect light in a desired direction. 

Some photographers use flashes in order to create fill light. Flashes can be positioned in multiple angles, and some can even be shot independent of the actual camera. One example of using Flash as fill light is when I took the picture of the baby below. This picture was taken under a 10x10 beach tent at night. I did not want to much light coming from one direction to hit the babies face so I angled the flash directly upwards. By doing so, the light from the flash bounced off the tent's ceiling and so the entire tent became a huge light box. By examining the picture you will see little, too none, notable shadows that are over powering (the background is dark because I took this outside during the night and so the amount of light inside the tent drained out the visible objects in the background, and a low f/stop also helped). 


Bounce light is VERY useful, especially during portrait photography. So make sure to be aware of it's usefulness and how to best control it. Observe your surroundings for possible "reflectors" (i.e. walls, tables, flat surfaces) and be creative with light sources and when to take pictures (refer to my "The Golden Hours" post).

If you have any questions about my pictures, posts, or photography over all send me a message or comment below (comments are preferred since they may serve the purpose of answering the question for everyone with similar questions.) and remember SUBSCRIBE!

Keep Snappin',ravimi

Tuesday, June 5, 2012

Photo TIPS! ~ "The Golden Hours"

First I would like to start off by welcoming the first ever follower of RPB (Ravimi Photography Blog) "TheLittlePictureBox"! Yay (fireworks in the background, while drunk people fall over from the after after after party). Thanks for joining me on the journey through photography!

Now back to the normally scheduled program. Today I would like to discuss "The Golden Hours" which I referred to in the last "Photo and Personal Style" post. The Golden Hours refers to a time of day in which photographers in the photography community (I know, redundant) generally have dubbed "The best time of the day for taking pictures". The reason for the nice title is because it's a time when the sun gives off it's most vibrant light. This time is from when the sun rises to about 9-10am, and when the sun is setting, mostly the period after 5pm (lol, sorry Alaska), to when it is completely gone. I'm sure a lot of you, if not all, have seen a picture of the sunset/sunrise, it contains vibrant colors that shine beautifully which is one of the reasons it is so greatly praised.

This is one of my Sunset pictures, taken on Christmas day.
During "The Golden Hours" the sun light can be strong but it is coming from an angled direction that is not directly above. Sunlight during the middle of the day, in most cases, is very harsh and may cause pictures to look bleached out (over exposed) even when the settings have been adjusted. The reason for this is because shadows created by the harsh light creates too much of a contrast which will make skin exposed to the light look "washed out" relative to the darkness of the skin that is covered by shadows. I would describe this effect similar to that of a camera trying to take video of a dark subject while there is a light reflector surrounding the subject and is pointing directly at the lens. Midday light comes directly from above which is not always forgiving towards the person being photographed. The example picture of the foot prints below (Image is called "Bajo Relieve") shows how shadows from the Golden hours can be used, and how midday sun can actually destroy interesting shadows.

The light of "The Golden Hours" comes from a lower angle and this allows the photographer to dictate where the model will stand for the best exposure. The less-harsh light seems to wrap around the subject because there is very little contrast between the actual direct sunlight and fill light (light that is reflected from surfaces or comes from other mediums with the purpose of lowering the amount of contrast created by the main source of light: in other words I'll leave it for a later tutorial). An example of this is the portrait below.

So be sure to use "The Golden Hours" as a very important tool. It serves as a great time of day when the sun creates favorable and colorful light, and is also the coolest part of the day (excluding night of course).


If you have any questions about my pictures or photography over all send me a message or comment below (comments are preferred since they may serve the purpose of answering the question for everyone with similar questions.) and remember SUBSCRIBE!
Keep Snappin',
ravimi


I took this in the afternoon when the sun was setting.
If I would have taken this during the middle of the day
the shadows that help create the feeling of the feet popping
out would not have been possible. 
As described above, the afternoon light from
"The Golden Hours" (so holy)
contains light that is not to strong and allows
the rest of the subjects face enough light
that the contrast wont be too noticeable.


Monday, June 4, 2012

Photo and Personal Style

This picture was part of  my first big profit job. The model wanted some pictures taken by me because he liked my personal philosophy of capturing the person for who they are, and he also enjoyed my pictures he had seen. Knowing his personality I decided it would be nice to have an outdoors photoshoot with strong colors (as shown by the strong blue sky and yellow shirt) and strong energy being radiated by the model. We went out to a nearby dock since it was far away from trees and buildings that could get in the way of the framing. We also started the shoot in the afternoon, around 5-6pm, so that the sun was close to the horizon while still maintaining enough light for the picture (this is referred to as the "Golden Hours", I will go over this in a future tutorial).

The model has a strong body figure, he is very fit and has had experience with modeling professionally so I decided to give him a look that showed his strength and inner power. I took the picture from below to make him appear larger than life and made sure that his elbows would not fall outside of the frame while maintaining a tight composition that also pushed the idea of his thin figure. The negative space (refers to the empty space) helps bring out the idea of internal strength/spiritual power (I will go over the use of Negative space in a future tutorial). And lastly I always made sure to help him give off a feeling of strength accompanied by a relaxed aura. 

If you have any questions about my pictures or photography over all send me a message or comment below (comments are preferred since they may serve the purpose of answering the question for everyone who sees it.)

Keep Snappin',
ravimi


    ISO 100
    1/2500 shutter speed
    2.8 Aperture
    50mm

   This is another picture I took that day.  
    ISO 100
    1/125 Shutter speed
    7.1 Aperture
    50mm
    

Saturday, June 2, 2012

Photo and Personal Style

I took this today at my friends party. I love this image because of how much it shows the girls personality: huge amount of energy and wonderful smile. The details of the image are below the image, all the images I will be posting on this blog along with ALL the other places I post consist of photographs straight from the camera. I'm trying to build a name for myself as a straight out of camera photographer; some may call it crazy, others stupid (for valid reasons that I do understand), BUT I have decided this path therefore I will follow it, and so far it has worked to my expectations, and beyond. Also! please forgive me for grammar mistakes and everything else haha, English grammar is not my forte.

If you have any questions about my pictures or photography over all send me a message or comment below (comments are preferred since they may serve the purpose of answering the question for everyone who sees it.) 

Keep Snappin',
ravimi
ISO 100
1/320 shutter speed
2.5 Aperture
50mm
Sepia

Photography